AME 3623: Project 0
- All components of the project are due by Tuesday, February 16th
at 5:00 pm.
- Discussion and collaboration within your assigned groups is fine.
- Discussion across groups may not be about the specifics of the
solution (general programming/circuit issues with other groups
are fine to discuss).
By the end of this project, each individual in the group will demonstrate:
- writing, compiling and downloading code to the Teensy,
- writing code that affects the state of the digital output
ports, and
- writing code that reads the state of the digital input ports.
Component 1
Each individual must create their own circuit. However, groups are
encouraged to meet to work through the wiring and coding process.
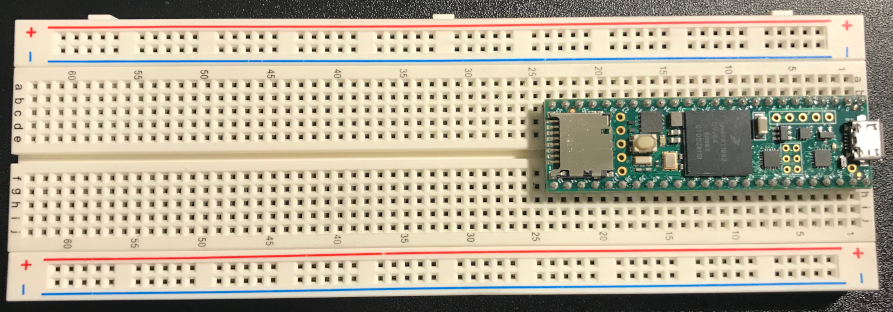
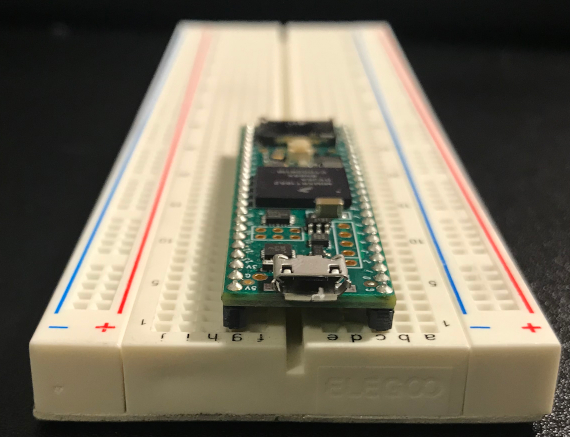
Insert your microprocessor slowly into the breadboard:
- The USB connector should hang off the end of the breadboard.
- Remember to only hold the processor by its edges.
- When you push downward on the processor, do so only along
the pins (ideally in the corners of the processor).
- Note that some of the newer breadboards are very resistant to
having pins/wires inserted into the holes. If you are having
difficulty inserting the processor, then:
- Remove the processor
- Use a single wire to poke into the holes that you plan
to use for the processor. This will loosen up the
connections.
- Replace the processor
- When you are done, it will look like this:


Complete the circuit:
- Connect +3.3V power and ground to the power and ground buses on
the breadboard.
- Remember that the power and ground buses are separated
into four unconnected regions (two regions along each
horizontal line in the above figure).
- Add short jumper wires between each horizontal pair of
regions.
- Add longer jumper wires to connect the horizontal power
buses; do the same for the ground buses. This is best
done on the end opposite to the Teensy.
- Always try to use the shortest wires possible. However,
minimize the amount of wire that is exposed.
- Connect at least four LEDs to different output pins on your Teensy. These
pins must be on the same Teensy port. Each of these LEDs needs to be
connected to ground through their own 200 ohm resistor.
- Connect another Teensy pin on the same port to +3.3V through
a 10K-ohm pull-up resistor. Connect this same processor pin to
one of the side pins of a switch. Connect the
common (middle) switch pin to ground.
Component 2
Each group member must write a program that:
- Waits for the switch to be pressed, then
- Displays an interesting LED flashing pattern. The flashing
pattern of each group member must be different.
- Once the switch is released, the LEDs must turn off.
- Repeat when the switch is pressed again
Notes
What to Hand In
All components of the project are due by the Tuesday deadline at 5:00 pm.
- Code: Check your documented
code into the project0 area of Gradescope.
Remember that documentation is about helping you and others
looking at your code to understand what it is doing.
Therefore, it will generally describe the logic of the code
(and not-necessarily the low-level details). For this class:
- At the top of your C file, provide project-level
documentation: include the project number,
group number, group members, date and the group member responsible for
the code.
- Each function must be documented (above the function
header). This documentation must include:
- A description of what the function does at a logical level,
- A list of the input parameters and what their meanings are,
- A description of the return variable type and meaning, and
- If the function has external effects (e.g., commanding an
actuator or modifying a global variable), these must
also be documented here.
NOTE: for project 0, no function-level documentation is required.
- In-line comments must be used to describe logically what is
happening at that line or group of lines.
See an example for the specific format that we are looking for.
Demonstration/Code Review
- The review triggers the grading process.
- The review must be completed by the Friday following the
deadline. However, the sooner you have feedback, the
better prepared you will be for the next project.
- The code and circuit must not have changed since the
deadline (unless your group is taking a time penalty).
- All group members must be present.
- If a code review is completed before the deadline, you
have the option to resubmit for an improved grade, as
long as the submission is done before the deadline.
Note that the resubmission may require a new code
review.
Grading
This semester, we will be using a grading model in which points will
be negotiated during the code review process.
Our goal is for individuals and groups to take a serious look at their
own performance in the projects relative to the expectations that have
been documented in the project specifications. Our hope is that
everyone will learn to assess how well they have performed a given task.
This approach is also intended to give everyone a bit more flexibility
as we deal with COVID distancing and with differences in your backgrounds.
For the first few projects, points will largely be assigned by the
teaching staff, with an explanation for any points that are taken off
of the full score. By the end of the semester, individuals / groups
will assign their own score and justify their choices. These scores
and justifications will be reviewed (and perhaps adjusted) during the
code review process.
For this project, we expect:
- A properly configured circuit
- Microprocessor installed
- LEDs wired to the microprocessor (all to the same PORT)
- Switch wired to the microprocessor (to the same PORT as
the LEDs)
- Properly written software
- Interesting LED flashing pattern
- Flashing pattern is conditioned on the switch being
pressed
- The LEDs are controlled using the PDOR template that we
have described in class and in the above specification
- Properly documented code
- Project-level documentation at the top of the ino file:
name and group number, date and project number
- In-line documentation inside of functions: individual
lines or small groups of lines have an English
description that describes logically what the code is doing
References
andrewhfagg -- gmail.com
Last modified: Thu Feb 18 00:35:42 2021


